
DIY STAIRCASE MAKEOVER
Note: This post contains affiliate links and I may earn a small commission if you choose to shop through my links.
Please keep in mind that the price + availability of items featured within the post may change after publish date
If you’re looking for a semi-tedious project to occupy your time, elevate your space and add value to your home during this pandemic — look no further.
This DIY staircase makeover checks alllll the boxes and, best part? It’s easy on the wallet and achievable with a few,
common tools and materials you likely already have in your arsenal.
I’m covering the bases with a full step-by-step breakdown on how we remodeled our staircase below. Bonus? I’ve compiled a full list of the tools, products and materials we used to pull the whole thing off.

TOOLS + MATERIALS
Painter’s Tape
Protective Work Gloves + Glasses
Sanding Blocks or Electric Sander
Flat + Dense Paint Brushes
Sponge Brushes
Hammer
Screwdriver
Needle-Nose Pliers
Finishing Nails + Trim
Caulk + Plaster
White Rags or Lint-Free T-Shirt
General Finishes Gel Stain in Java
General Finishes Water-Based Top Coat in
High-Performance Semi-Gloss
Valspar High-Gloss Paint in Extra-White
White Primer

1. SAND RAILING + SPINDLES
The order of operations when remodeling a staircase is to work from the top, down.
Start your project by refinishing the railing, spindles and any other external molding and trim. Doing so will allow you to work without freely — without worrying about dripping globs of white paint onto your freshly-stained steps below.
Use a wet cloth to remove debris or dust from the surfaces you plan to refinish. Wipe surfaces dry, then glide sanding blocks or a hand-held electric sander in the direction of the grain to remove varnish and restore wood to a raw, natural state.

2. STAIN RAILING
Two things to share here —
1. The General Finishes Gel Stain formula is unmatched. This stuff has a cult following for a reason. It’s easy to apply, a little goes a crazy-long way (love that for our wallet!) and it performs like a dream. We chose the shade Java which is a dreamy and decadent, dark chocolate x espresso tone.
2. The gel stain is formulated to create both an opaque, paint-like finish or a true, saturated stain effect on wood. Your end-results are directly correlated with your application technique.
For an opaque finish, use a soft brush or sponge to apply stain to the wood in the direction of the grain. Allow to sit for 10-15 minutes before wiping away the excess product (if any) with a lint-free cloth.
For a saturated wood finish, use a soft brush or sponge to apply stain to small sections of the wood in the direction of the grain. Allow to sit for no more than 3-5 minutes before using a lint-free cloth to wipe off the excess stain. Tip: avoid streaks by applying a small amount of gel stain onto your cloth before wiping off the excess stain from the wood.
Allow stain to dry for 24 hours before applying second coat, if desired. Once happy with the tone of your stain, allow to dry for another 24 hours before applying the General Finishes Semi-Gloss sealant.

3. PAINT + PRIME SPINDLES
Use painter’s tape to create a secure border between the spindles and railing. With the tape in place, use a dense brush to apply 2-3 coats of primer to each spindle.
Create a smooth, streak-free finish on circular spindles by applying paint horizontally around the circumference of the spindle. Reserve vertical paint application to flat surfaces to ensure seamless results.
Once satisfied with your primer base, move on to apply 1-3 coats of the high-gloss white paint.
Apply primer and gloss paint to remaining exterior trim and molding before moving on to step 4 — CARPET REMOVAL!

4. R.I.P. CARPET
Throw on closed-toe shoes, long pants, protective gloves and glasses then roll-up your sleeves and get to work!
Now, I can’t speak to the difficulty level of removing carpet from other staircases. That said, I can say that, from our personal experience, ripping up the carpet was a total breeze. We started at the base of the stairs and peeled back a corner of the carpet and from there, we simply pulled the carpet free one step at a time as we climbed the staircase.
The most difficult part? Step 5: STAPLE REMOVAL.

5. REMOVE ALLL THE STAPLES
Fix yourself a big cup o’ coffee and slap-on a back brace because you’ll need all the energy and support you can get while you’re pulling out those pesky staples.
Slip on your work gloves and put that caffeine to work with a pair of needle-nose pliers and a screw driver. Use the tools to loosen and remove the staples and finishing nails that were used to install the carpet.
The bad news? There are no shortcuts with this step. There will be hundreds of staples to remove and the process will drag on for no less than 4(!) hours before you get to a stopping place.
The good news? The end results are 100% worth the effort.
Oh, and don’t become too frustrated when you, inevitably, chip the wood while struggling to remove the staples/nails. The chipped details and indentions left behind will blend into the step once stained and add a touch of lived-in charm to the staircase.

6. SAND, SAND, SAND
You know the drill!
Throw on your protective gear and use an electric sander (if available) to sand the wooden surfaces down to a raw, unfinished state.
Use a Shop Vac to remove all dust and dirt from your freshly-sanded stairs, then wipe surfaces with clean, damp cloth before moving forward to Step 7.

7. STAIN TREADS
Pull-out the painter's tape and create barriers for the risers and the sides of the staircase before you begin staining the treads.
Start the staining process by applying the product to every other tread on your staircase. Doing so will not only ensure you do not compromise your freshly-applied stain by accidentally stepping on it, but it will also allow you to use your staircase freely throughout the process.
Apply stain to the second set of treads once the first set is completely dry. Repeat process for a second coat to achieve a deeper color.
8. PATCH + PAINT RISERS
Time to tape-off the stained treads and turn your attention to the risers.
Our risers were extremely textured and beaten-up from surplus of staples and, as such, required a lot of TLC to create a polished end result.
We used several techniques to get that smooth, crisp finish and, honestly? Each riser required a unique approach based on the texture presented.
Joey cut-up some leftover board we had in our garage to sit flush against risers on 13/16 steps. He installed with finishing nails, caulked the gap and coated with the Valspar gloss paint for a seamless look.
He coated the remaining risers with a thick layer of plaster to fill in the texture and create a unified surface. Once the plaster dried, he used a sanding block to level the riser before applying 2 layers of primer. Another 2 layers of the gloss paint rounded out the riser and now? The 3 plastered risers are virtually indistinguishable from their boarded counterparts.

9. A TOUCH OF TRIM
Get that clean, crispy look by applying dainty trim across the top of the riser, directly beneath the tread. Secure with finishing nails and use a detail brush to coat the trim with the same, high-gloss paint used on the risers below.
Though the trim may seem like a small detail, it packs a mighty, visual punch. The slim trim creates a ‘finished’ look, adds balance to the design and enhances the depth of the chocolatey tread, overhead.

10. SEAL THE DEAL
Apply a final coat of the General Finishes High Performance Semi-Gloss Top Coat to the treads and railing and use a small, detail brush to touch up the white paint throughout.
And, just like that, you’re done!
Worth it, yes?!
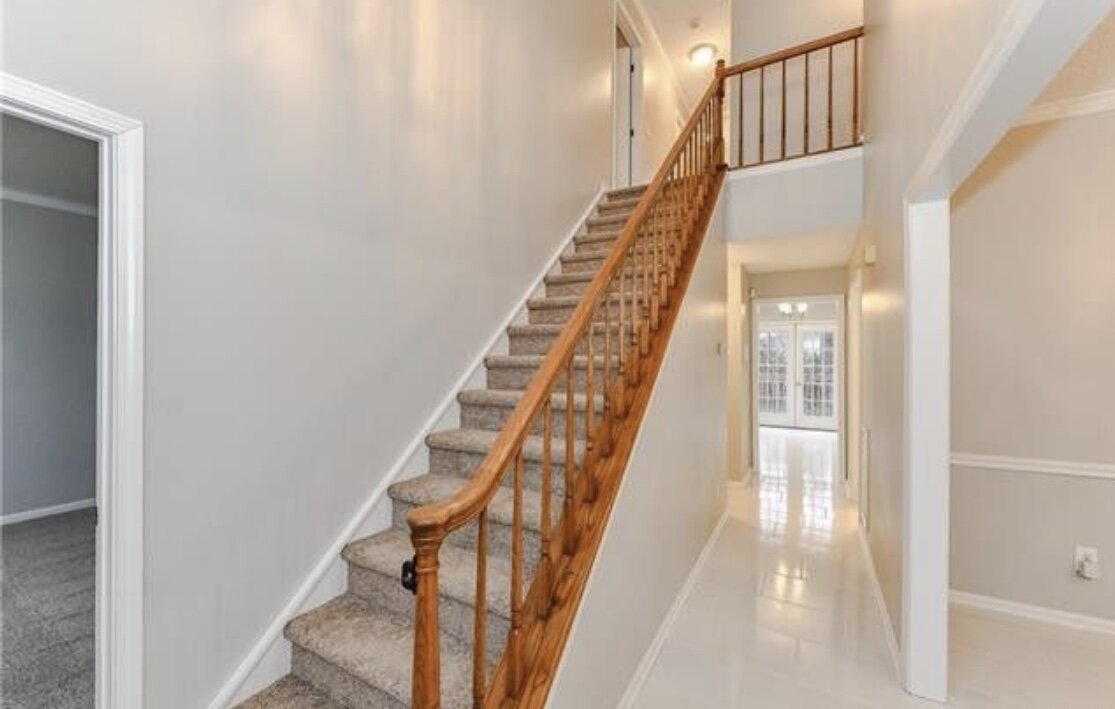
the BEFORE
Orange oak stairs, beige carpet and Agreeable Gray makes for one, very bland builder-grade foyer circa 1989.
Real talk — I’ll never understand how this orange oak situation was the desirable finish during the 1980’s. But, I mean, this was the time of spandex leotards, neon leg-warmers and crimped locks so you could argue that this staircase was one of the tamer byproducts of that era but, nonetheless, woof, right?

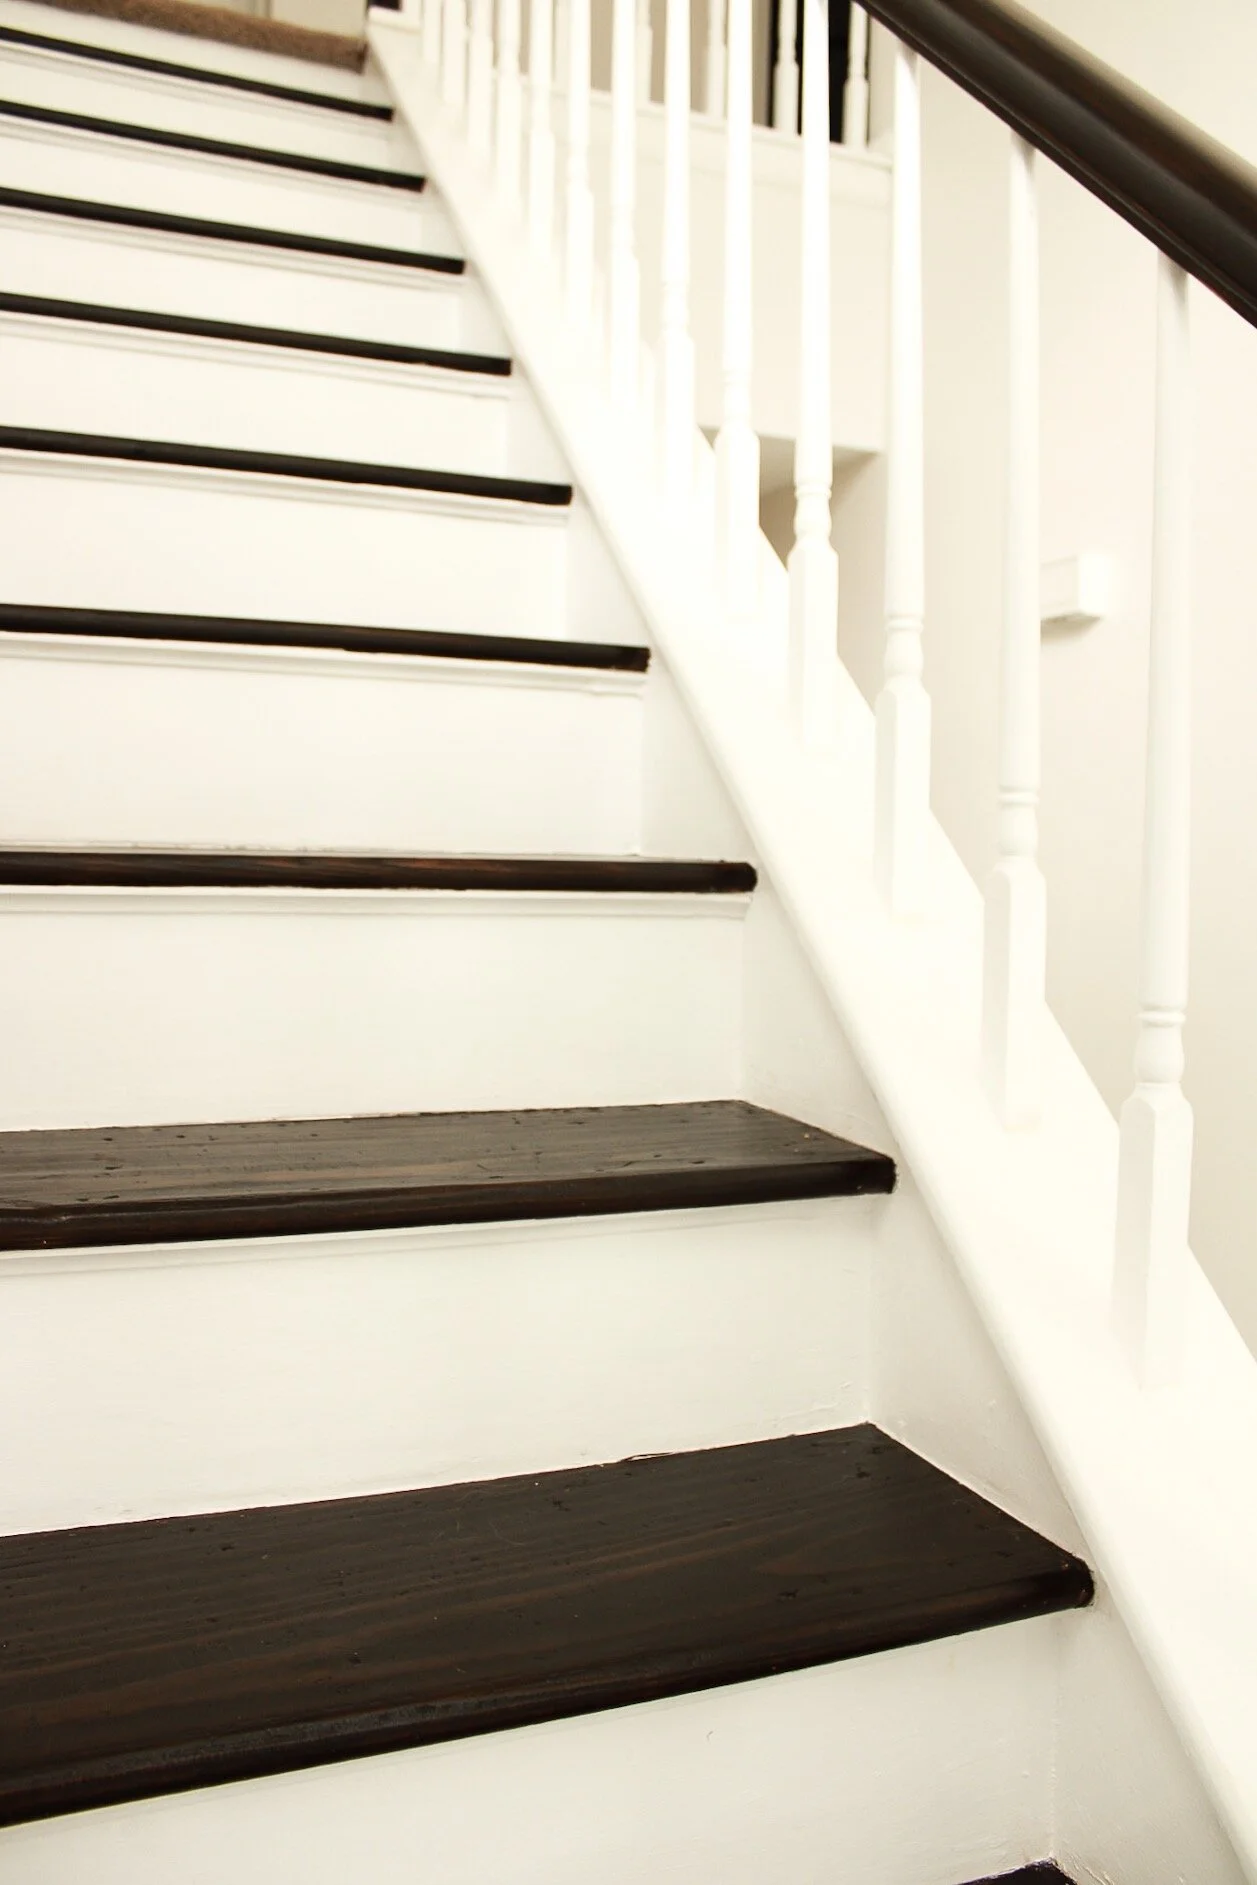
the AFTER
Rich, espresso-stained railing marries with bright-white risers and snowy walls to create a crisp and classic staircase designed to withstand the ages.
Neutral, high-contrast finishes infuse the space with timeless, understated appeal in keeping with our future foyer design plans. The white, lacquered frame speaks to the built-in bookcase and custom fireplace surround in our great room, creating a sense of sophistication and continuity throughout our home.
shop the post
